


That pile of old shirts, worn jeans and leftover material in the back of your closet is more useful than it looks. With the right scrap fabric projects, even small offcuts can become tote bags, home decor, gifts and practical accessories instead of ending up in the trash.
These 20 fabric scrap projects and clothes upcycling ideas include both no-sew options and easy beginner sewing projects. You can reuse old clothes you already own, work through a growing basket of fabric scraps and create things you will genuinely use.
You do not need a perfectly coordinated fabric stash. A mix of florals, denim, stripes and solids often makes these projects look more personal. Wash everything first, remove any damaged sections and save useful buttons, zippers and pockets before you begin.
Choose a Scrap Fabric Project
| Material you have | Good projects to try | Skill level |
|---|---|---|
| Old T-shirts | Tote bags, headbands and braided pet toys | Beginner |
| Old jeans | Denim aprons, storage bins and garden markers | Beginner to intermediate |
| Tiny fabric scraps | Coasters, bracelets, bunting and fabric flowers | Beginner |
| Old sweaters | Mittens, pillows and soft storage | Intermediate |
| Scarves and larger remnants | Bags, book covers and reusable gift wrap | Beginner |
| Old towels | Reusable cleaning cloths and hand towels | Beginner |
Useful Tools for Scrap Fabric Projects
Disclosure: As an Amazon Associate, NewTrendsetter earns from qualifying purchases.
- Fabric Scissors
Clean cuts through layered fabric - Beginner Sewing Machine
Simple stitches for everyday projects - Beginner Sewing Kit
Needles, thread and basic notions - Washable Fabric Glue
Useful for selected no-sew crafts - Rotary Cutter and Mat
Fast, even patchwork pieces - Fusible Interfacing
Adds shape and structure - Washable Fabric Markers
Mark cutting and stitching lines - Fiber Fill
For pillows, toys and soft crafts
Shop This Look

ORTHOTICS ARCH SUPPORT: Firm foot arch support of 3.5 cm height provides effective full arch support for preventing and alleviating pain associated with common foot conditions. Ideal orthopedic insoles for kids with flat feet, over pronation, high arch, low arch, common foot pain, arch pain, heel pain & plantar fasciitis.

➹【FABRIC】: Denim. Material: 100% cotton. It has thick thickness, no elasticity, good fabric fastness and strong wear resistance.
1. T-Shirt Tote Bag: An Easy Old-Clothes Upcycling Idea

Shop This Look

CONVENIENT 6-PACK VALUE - Stock up on everyday essentials with six cotton ribbed tank undershirts designed for dependable comfort, moisture-wicking performance, and easy everyday layering.

CUSHIONED ALL-DAY COMFORT: A cushioned foot delivers comfort and durability through the everyday athletic rotation — gym workouts, weight room sessions, running, daily walks, weekend tennis and full-day casual wear — delivering a no-slip fit. Built for active men who put in the miles.

QUALITY FABRIC – Our ComfortSoft men's boxers are made from 100% cotton (solid shades) or 75% cotton/25% polyester (heathered shades).
T-Shirt Tote Bag Tutorial
45–60 minutes
Beginner
Medium-weight cotton jersey
Depends on the shirt
You’ll Need
- One clean adult T-shirt without holes at the shoulders
- Sharp fabric scissors
- Ruler and washable fabric marker
- Sewing clips or pins
- Sewing machine, all-purpose thread and a ballpoint needle
Step-by-Step Instructions
- Prepare the shirt. Wash and dry it, then lay it flat and smooth out the side seams. A medium or large shirt gives you the most useful grocery-bag size.
- Create the handles. Cut off both sleeves just inside their seams. Try to make the two openings symmetrical.
- Shape the opening. Mark a shallow U-shape approximately 3–4 inches below the existing neckline. Cut through the front and back layers together.
- Close the bottom. Turn the shirt inside out, align the lower edges and clip them together. Sew across the bottom with a ½-inch seam allowance.
- Reinforce the seam. Sew a second straight line approximately ¼ inch inside the first. Backstitch at both ends.
- Add optional boxed corners. Flatten each lower corner into a triangle and stitch across it about 2 inches from the point. This gives the tote a flatter base.
- Finish and test. Turn the bag right side out, trim loose threads and test it first with lightweight items before carrying groceries.
No-sew alternative
Cut a 3-inch-deep fringe along the bottom, with each strip about 1 inch wide. Double-knot each matching front and back strip. This version is best for lightweight contents and should be checked before every use.
2. Patchwork Quilts Made with Fabric Scraps

Best for: Woven cotton remnants | Difficulty: Intermediate | Time: A weekend or longer | Method: Sewing
A patchwork quilt is one of the most satisfying ways to use a large collection of fabric scraps. Start small with a cushion cover, table runner or lap quilt rather than committing to a bed-size quilt. Cut equal squares, arrange them on the floor and photograph the layout before you begin sewing. Join the pieces into rows with a consistent quarter-inch seam allowance, then join the rows.
Woven cotton pieces behave more predictably together than a mixture of stretchy knits and heavy denim. Press each seam as you go and add cotton quilt batting when the top is complete. For more inspiration, explore these quilting ideas for leftover fabric.
Shop This Look

Classic Khaki Chambray: Woven from pure cotton, our Khaki Chambray is lightweight and soft-to-the-touch. The uniquely textured fabric is casual and classic, and perfect for warm weather--or any season! Bags are lined in a vintage-inspired navy and khaki check. Wallets are lined in a ditsy khaki floral.

Classic Khaki Chambray: Woven from pure cotton, our Khaki Chambray is lightweight and soft-to-the-touch. The uniquely textured fabric is casual and classic, and perfect for warm weather--or any season! Bags are lined in a vintage-inspired navy and khaki check. Wallets are lined in a ditsy khaki floral.

Classic Blue Chambray: Woven from pure cotton, our Blue Chambray is lightweight and soft-to-the-touch. The uniquely textured fabric is casual and classic, and perfect for warm weather (or any season!). Bags and wallets are lined in a vintage-inspired ditsy khaki floral.
3. Upcycling Jeans into a Practical Denim Apron

Shop This Look

High Quality Materials: This apron for women with pockets is made from fabrics of cotton denim, thicker than a common polyester apron, which belongs to uniform clothing. Soft, stylish, lightweight, but durable work apron with a smooth touch. Ideal for chefs, cooking, BBQ, and workshop use
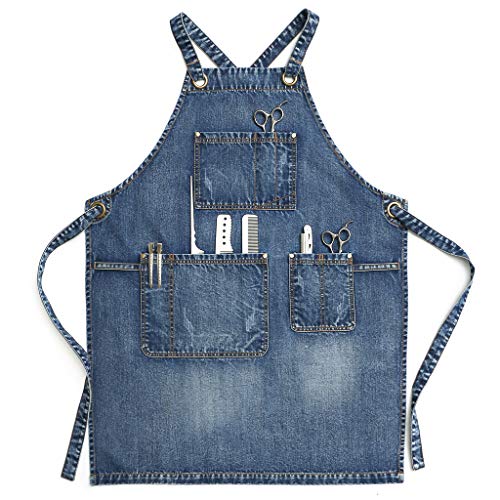
➹FABRIC: 93% cotton, 7% polyester. It’s a fashion apron, high functionality, durability.

VINTAGE DENIM PROFESSIONAL STYLE – Crafted from 100% cotton denim, this bib apron delivers a rugged yet refined appearance that complements modern restaurants, cafés, bars, bakeries, and hospitality environments.
Full Denim Apron Tutorial
2–3 hours
Confident beginner
Medium-weight denim
About 30 inches
You’ll Need
- One large pair of old jeans, or two pairs for a wider apron
- Paper for making an apron template
- Fabric scissors, ruler, marker and sewing clips
- Denim sewing-machine needle and strong all-purpose thread
- Approximately 3 yards of 1-inch cotton webbing or sturdy fabric strips
- Optional bias tape for neatly finished edges
Step-by-Step Instructions
- Prepare the denim. Wash the jeans, remove rivets or damaged areas you will not use, and open the inner leg seams with scissors or a seam ripper.
- Flatten the panels. Cut along the curved crotch seams so the denim lies flat. Overlap two leg sections slightly and stitch them together if one section is not wide enough.
- Make a template. Draft an apron approximately 30 inches long, 10–11 inches wide across the bib and 22–24 inches wide at the lower edge. Curve the sides gently from the bib to the waist.
- Cut the apron front. Position the template to feature attractive seams or faded areas. Trace it, add a ½-inch seam allowance if you plan to hem the edges, then cut.
- Add the pockets. Carefully remove one or two back pockets from the jeans. Pin them where they are comfortable to reach and stitch around the sides and bottom, leaving the top open.
- Finish the raw edges. Fold each edge under ¼ inch twice and topstitch, or enclose the edge in bias tape. Use the handwheel when crossing thick original seams.
- Add the ties. Cut one neck strap approximately 24 inches long and two waist ties approximately 30 inches each. Secure every strap with a stitched square and an X through the center.
- Check the fit. Try the apron on, shorten the straps if necessary and reinforce any area that pulls when you move.
4. Easy Scrap Fabric Coasters from Old Shirts

Scrap Fabric Coaster Tutorial
45 minutes
Beginner
Woven cotton
About 4½ inches
Materials for Four Coasters
- Eight cotton squares measuring 5 × 5 inches
- Four thin cotton-batting squares measuring 4½ × 4½ inches
- Ruler, washable marker, scissors and sewing clips
- Sewing machine, thread and iron
Step-by-Step Instructions
- Cut accurately. Cut two 5-inch fabric squares for each coaster. Cut the batting slightly smaller to reduce bulk in the seams.
- Layer the pieces. Place one fabric square right side up, the second right side down and the batting on top. Clip all three layers together.
- Mark the opening. Leave a 2½-inch turning gap along one side. Do not place the opening at a corner.
- Sew the perimeter. Use a ¼-inch seam allowance, pivoting at each corner. Backstitch on both sides of the opening.
- Trim and turn. Clip diagonally across each corner without cutting the stitching. Turn the coaster right side out and gently shape the corners.
- Press carefully. Fold the opening edges inward so they align with the sewn seam, then press the coaster flat.
- Topstitch. Stitch approximately ⅛ inch from the outer edge around all four sides. Add a square, X or simple quilting line through the center to hold the layers together.
5. Beginner-Friendly Reversible Fabric Headband

Reversible Fabric Headband Tutorial
45–60 minutes
Beginner
Quilting cotton
Most adult heads
You’ll Need
- Two coordinating fabric rectangles, each 4 × 18 inches
- One fabric rectangle for the elastic casing, 3 × 10 inches
- One piece of ¾-inch soft elastic, approximately 6 inches long
- Safety pin, sewing clips, thread and iron
Step-by-Step Instructions
- Make the main band. Place the two 4 × 18-inch pieces right sides together. Sew both long edges with a ¼-inch seam allowance, leaving the short ends open.
- Turn and press. Turn the tube right side out, center the seams along the upper and lower edges and press flat.
- Make the casing. Fold the 3 × 10-inch rectangle lengthwise with right sides together. Sew the long edge using a ¼-inch seam, then turn and press.
- Insert the elastic. Attach a safety pin to one end of the elastic and feed it through the casing. Secure the first end with several rows of stitching before pulling the elastic through to the other end.
- Gather the casing. Pull the casing fabric evenly over the elastic and stitch the second end securely so the elastic cannot retreat inside.
- Check the fit. Temporarily clip the casing to both ends of the main band and try it on. Shorten the elastic if it feels loose; never make it uncomfortably tight.
- Join the pieces. Fold each raw end of the main band inward by ½ inch. Insert one casing end about ½ inch into each opening and topstitch across the ends twice.
- Finish. Add optional topstitching along the long edges and give the headband a final press.
6. Fabric Scrap Wall Art

Best for: Tiny patterned scraps | Difficulty: Easy | Time: About 1 hour | Method: No-sew or hand-sewn
Turn favorite fragments of old clothing into art instead of hiding them in a drawer. Stretch one larger piece over a small canvas, or layer smaller shapes into flowers, houses or an abstract design. Arrange everything before attaching it so you can balance the colors and patterns.
Fabric glue works for a quick no-sew version, while visible hand stitching gives the piece extra texture. Buttons, lace and embroidered sections from worn clothing can become focal points. If you enjoy this idea, these fabric scrap crafts offer more ways to turn leftovers into decorative pieces.
7. Braided Pet Toys from Old Clothes

Best for: T-shirts and fleece | Difficulty: Easy | Time: 15–30 minutes | Method: No-sew
Cut three or six long strips from a clean T-shirt or fleece garment, knot them firmly at one end and braid them as tightly as possible. Tie a second secure knot at the other end. The stretch in jersey fabric creates a soft tug toy that is comfortable to hold.
Pet projects require extra care. Remove buttons, zippers, beads and loose threads, and never use fabric treated with glitter or unknown chemicals. Supervise play, inspect the toy frequently and discard it when pieces begin to separate. A homemade fabric toy is not suitable for a pet that swallows or rapidly destroys textiles.
8. Throw Pillows Made from Upcycled Clothing

Best for: Sweaters, shirts and larger remnants | Difficulty: Easy | Time: 1–2 hours | Method: Sewing
A favorite shirt or sweater can live on as a cushion cover after it is no longer wearable. Cut a front and back panel at least one inch larger than your pillow form. Stabilize stretchy sweater fabric before cutting, place the panels right sides together and sew around the edge, leaving an opening for the insert.
Turn, press and add a correctly sized throw-pillow insert. Shirt buttons can become a ready-made envelope closure, while pockets make charming decorative details. Choose fabrics with similar washing requirements if you combine several garments.


9. Fabric Book Covers from Old Shirts

Best for: Woven cotton | Difficulty: Easy | Time: 45–60 minutes | Method: Sew or no-sew
Open the book and measure the full width from the outer edge of the front cover, around the spine, to the outer edge of the back. Add approximately 6 inches for the two inner flaps and 1 inch for seam allowances. Cut the fabric, hem the upper and lower edges, then fold the ends inward to create pockets for the covers.
Sew the flap edges or secure them with washable fabric glue for a lighter-use version. Add a ribbon bookmark, small label or button-and-loop closure. Because the cover can be removed, it is easy to wash or move to another notebook of the same size.
10. Turn an Old Scarf into a Simple Bag

Best for: Large woven scarves | Difficulty: Easy | Time: 30–60 minutes | Method: Sew or knot
A large scarf can become a lightweight market bag, gift bag or organizer. Fold it with right sides together, stitch the side seams and reinforce the upper corners. Create handles from sturdy cotton webbing, a retired belt or additional folded fabric. If the scarf is sheer, add a simple cotton lining so small items cannot escape.
For a temporary no-sew version, use a traditional knot bag technique, but do not carry heavy or valuable objects until you have tested every knot. This project works best with square scarves and is a quick answer when you are wondering what to do with old clothes and accessories.
11. Scrap Fabric Bunting for Parties and Home Decor

Best for: Medium and small woven scraps | Difficulty: Easy | Time: About 1 hour | Method: Sew or glue
Make a cardboard triangle template, trace it onto your scraps and cut an odd number of flags. For double-sided bunting, sew pairs of triangles right sides together, turn them and press. Space the finished flags evenly inside folded bias tape and stitch along the entire length.
A no-sew garland can be made by folding single-layer flags over sturdy ribbon and fixing them with fabric glue. Mix prints within one color family for a calm look, or use contrasting scraps for birthdays, nurseries and garden parties. Keep long garlands out of reach of babies and pets.
12. Decorative Fabric Masks for Costumes and Dress-Up

Best for: Closely woven cotton scraps | Difficulty: Intermediate | Time: 30–60 minutes | Method: Sewing
Colorful remnants can become decorative masks for costumes, theater props and imaginative dress-up. Draft a paper template that sits comfortably around the eyes and nose, cut two mirrored fabric layers and add lightweight interfacing for shape. Sew around the edge, clip the curves, turn and topstitch before adding soft ties or elastic.
Safety note: This project is decorative only. It is not medical equipment, respiratory protection or a substitute for a certified dust mask. Make sure vision and breathing remain completely unobstructed, and supervise children whenever ties or elastic are used.
13. Reusable Cleaning Cloths from Old Towels

Best for: Clean cotton towels | Difficulty: Easy | Time: 20–45 minutes | Method: Sewing
Old towels often become thin in only one area, leaving plenty of absorbent fabric for reusable cleaning cloths. Cut around stains and worn patches, then make equal rectangles or squares. Finish the edges with a zigzag stitch, overlocker or folded cotton binding to control fraying.
Assign different colors to the kitchen, bathroom and general cleaning, and store used cloths in a ventilated basket until wash day. Wash them thoroughly before the first use and avoid repurposing towels that have been exposed to harsh chemicals, mold or contamination.
14. Braided Bracelets from Tiny Fabric Scraps

Best for: Long narrow strips | Difficulty: Easy | Time: 15–30 minutes | Method: No-sew or hand-sewn
Cut three strips approximately twice the desired finished bracelet length. Knot them together, secure the knot to your work surface and braid firmly. Wrap the ends with embroidery thread or tuck them under a small stitched fabric tab. A button-and-loop closure makes the bracelet easier to remove than a permanent knot.
Mix one floral, one solid and one striped fabric for a balanced design. Soft cotton is most comfortable against the skin. Avoid fraying metallic fabric or trims with sharp embellishments, especially when making bracelets for children.
15. Reusable Fabric Gift Wrap

Best for: Scarves and square fabric pieces | Difficulty: Easy | Time: 10–20 minutes | Method: No-sew
Reusable fabric wrap turns part of the packaging into a second gift. Cut a square large enough to gather over the item, finish the edges if needed and use a simple knotting method to secure it. A scarf requires no cutting at all and works beautifully around books, boxes, candles and small jars.
Add a sprig of greenery, a wooden tag or a narrow scrap tied into a bow. Tell the recipient that the fabric is intended to be reused so it does not accidentally end up in the trash. Choose washable material when wrapping food containers or homemade treats.
16. Garden Markers Made with Upcycled Fabric

Best for: Bright cotton scraps | Difficulty: Easy | Time: 30–45 minutes | Method: No-sew
Small fabric flags make seedlings easier to identify and add color while the garden is still waking up. Wrap a narrow scrap around a wooden plant stake, glue or stitch the edges together and write the plant name on the flag with a permanent fabric marker.
These markers are best for a covered porch, greenhouse or one growing season because ordinary fabric will fade outdoors. Keep loose ribbons short so they cannot tangle around plants or wildlife. At the end of the season, remove every stake and compost only the untreated natural-fiber pieces.
17. Padded Phone Sleeve from Leftover Fabric

Best for: Quilted cotton or denim | Difficulty: Intermediate | Time: 1–2 hours | Method: Sewing
Measure the phone and add room for seam allowances, thin batting and the opening. Cut matching outer and lining pieces, fuse or baste the batting to the outer layer and sew the sleeve with right sides together. Boxed lower corners create extra space, while a flap and hook-and-loop dot help keep the phone inside.
Check the fit with an empty case or similarly sized object before inserting the phone. Keep metal fasteners away from the screen. This soft sleeve protects against scratches in a handbag, but it is not a certified drop-resistant or waterproof phone case.
18. Mittens Upcycled from an Old Sweater

Best for: Felted wool or stable sweater knit | Difficulty: Intermediate | Time: 1–2 hours | Method: Sewing
Trace loosely around your hand on paper, leaving extra space for movement and a half-inch seam allowance. Cut two mirrored pairs from the sweater, keeping the lower ribbed hem for the mitten cuffs. Sew each pair with right sides facing, trim the curves carefully and turn.
Dense felted wool is easier to control than a loose, unraveling knit. If the sweater is thin, add a soft fleece lining. Make a test mitten first and check that the thumb has enough room before cutting the second pair. Wash according to the original garment’s care instructions.
19. Fabric Scrap Flower Bouquets

Best for: Tiny cotton and felt scraps | Difficulty: Easy | Time: 1–2 hours | Method: Glue or hand-sew
Cut circles, spirals or simple petal shapes, then layer them around a button center. Secure the layers with hand stitches or a small amount of hot glue and attach each flower to a wrapped wooden stem. Combine several sizes so the finished arrangement looks full rather than perfectly uniform.
A mini hot-glue gun is convenient, but the glue and nozzle can cause burns; follow the manufacturer’s directions and keep it away from children. Fabric bouquets make reusable table decorations, gift toppers and cheerful additions to a craft room.
20. Structured Storage Bins from Fabric Scraps

Structured Fabric Storage Basket Tutorial
2–3 hours
Intermediate
Canvas, denim or pieced cotton
About 8 × 7 × 4 inches
You’ll Need
- Two outer panels measuring 13 × 10 inches
- Two lining panels measuring 13 × 10 inches
- Two pieces of firm fusible interfacing, each 13 × 10 inches
- Two handle pieces measuring 3 × 8 inches
- Ruler, marker, scissors, iron, clips and sewing machine
Step-by-Step Instructions
- Create the outer panels. Use solid denim or canvas, or join smaller scraps until you have two pieces slightly larger than 13 × 10 inches. Press, then trim both panels accurately.
- Add structure. Following the manufacturer’s directions, fuse one interfacing piece to the wrong side of each outer panel.
- Sew the outer basket. Place the outer panels right sides together. Sew both side seams and the bottom with a ½-inch seam allowance.
- Box the corners. Flatten one lower corner so the side seam sits directly over the bottom seam. Mark a 4-inch line across the triangle, sew on the line and trim the point ½ inch beyond the stitching. Repeat on the other corner.
- Sew the lining. Repeat the side, bottom and boxed-corner seams with the lining, but leave a 4-inch turning opening in the bottom seam.
- Make the handles. Fold each 3 × 8-inch strip lengthwise and press. Open it, fold both long edges to the center, refold and topstitch both sides.
- Position the handles. Center one handle on each side of the outer basket with its raw ends aligned to the upper edge. Baste the ends securely, checking that neither handle is twisted.
- Join outer and lining. Keep the outer basket right side out and the lining wrong side out. Slide the outer basket inside the lining so right sides face. Match the upper edges and sew all the way around.
- Turn and finish. Pull the basket through the lining opening, close the gap with edge stitching and push the lining inside. Press the rim and topstitch around it.

Make Your Fabric Scraps Useful Again
The best scrap fabric projects solve two problems at once: they reduce waste and create something useful. Begin with a small project that matches the fabric you already have. A T-shirt tote, coaster set or braided bracelet delivers a quick result, while quilts and storage bins are rewarding ways to work through a larger stash.
Sort remnants by fabric type and size rather than waiting for a perfect idea. Large pieces can become bags and pillows, medium pieces work for book covers and bunting, and the smallest scraps can become flowers, bracelets or patchwork details. Once you start seeing old clothes as material, it becomes much easier to reuse them creatively.
Frequently Asked Questions
What can I make with small fabric scraps?
Small scraps are ideal for coasters, bunting, fabric flowers, bracelets, patchwork panels, covered buttons and decorative mending. Sort tiny pieces by color so they are easier to combine into a coordinated project.
How can I reuse old clothes without sewing?
Try a knotted T-shirt tote, braided pet toy, reusable scarf gift wrap, fabric wall collage or simple garden flags. Fabric glue can work for lightweight decorative crafts, but sewn seams are usually more durable for washable or weight-bearing items.
Which fabrics are easiest for beginner sewing projects?
Medium-weight woven cotton is generally easiest because it lies flat, cuts cleanly and does not stretch much. Slippery satin, loose sweater knits and very thick denim require more control and are better after you have practiced basic seams.
Should I wash old clothes before upcycling them?
Yes. Wash and dry the garment in the same way you expect to clean the finished project. This removes dirt and odors and allows any remaining shrinkage to happen before you measure and sew.
How should I organize fabric scraps?
Separate large, medium and tiny pieces, then divide them by fabric type. Clear bins, labeled baskets or zipper bags make it easier to see what you have. Keep stretchy knits, woven cotton and heavy denim apart because they behave differently when sewn.
Can different types of fabric be used in one project?
They can, but fabrics with similar weight, stretch and washing requirements are easier to combine. Stabilize stretchy or lightweight pieces with interfacing and test a small seam before assembling the entire project.
Affiliate disclosure: This article contains Amazon affiliate links. If you make a qualifying purchase, NewTrendsetter may earn a commission at no additional cost to you.


